This chapter contains the following topics:
PBS Labels provides you with a means of designing your own labels with different fonts and font sizes including bar codes.
The package that potentially is useful for printing labels is Inventory Control. If you do not have this module you may skip this chapter. If you also have Purchase Order, after you print a receiving you may use this label feature to print item labels.
Labels supports the entry of PCL codes for fonts, label design, and printing of labels.
There are several steps to creating a label.
1. Determine the type of label you are printing. This includes the number of labels across and down the page. They may be a continuous feed label.
2. If you are printing special fonts and bar codes you may need a particular printer and special cartridge to print the specific font you will need.
3. Using Enter print control codes enter codes as needed for fonts including the bar codes.
4. Design and test the label using the Create/Modify Labels features.
5. Print labels as needed.
You may need to use specific PCL (Printer Control Codes) for defining the printer functions and field printing.
This selection provides a means of entering PCL codes for causing the printer to use font styles and sizes.
Select
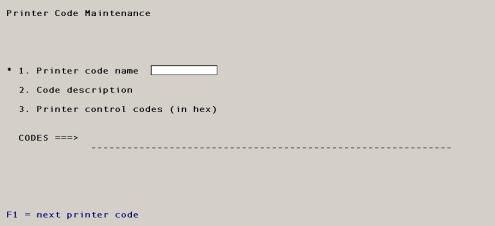
Enter Printer Control Codes under Labels from the Ctl menu.
You will see a screen like the following:
Enter the following fields:
*1. Printer code name
Enter the name of the printer control code.
|
Format |
10 letters |
|
Example |
BARCODE |
2. Code description
Enter the description of the code.
|
Format |
25 characters |
|
Example |
Item bar code |
When you select enter on the code description the printer control code window will display and will look similar to the following:
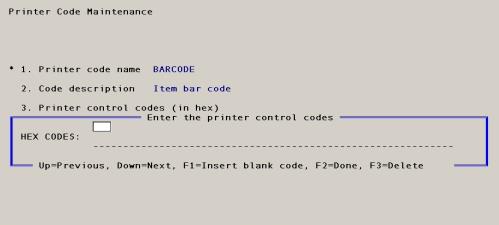
3. Printer control codes (in hex)
Enter the control codes.
There are a series of 30 two digit numeric fields. Enter as many of these as needed for printing the label.
|
Format |
thirty 2 digit numeric fields |
The following section describes in detail the entering of printer control codes:
You may have to enter hexidecimal codes so that the software can properly control the printing device. These are often referred to as “hexidecimal control codes” in the technical reference manual for a device.
The hexidecimal value entry window is a tool developed by Passport Software to simplify the process of entering these hexidecimal control codes.
Control codes are strings of characters that are sent to devices to control the operation of the device. For example, a control code can be sent to a printer to change the number of characters that the printer prints per inch, the printer’s tab settings or the font used.
When entry of a new hexidecimal control code is necessary, Labels provides the Hexidecimal Value field for entering the codes.
In order to make it easier to enter and edit control codes, the Hexidecimal Value Window provides the following features.
The code is entered one byte (2 hexidecimal digits) at a time.
Character conversion will take a single character you type and convert it to its associated hex code. There is no need to spend time looking up hex equivalents in a conversion table.
Suppose you want to enter control codes to set a smaller font for a HP LaserJet printer. This is the control code that would be entered to set the printer to print 12 characters per inch.
EC ( 8 U EC ( s 0 p 1 2 h 1 2 v 0 s 0 b 0 T
Explaining how this code works is beyond the scope of this manual.
Printer manufacturers will publish these codes. You need to review their documentation to determine what you need to enter.
The Hexidecimal Value Window makes entry of these codes simple. You type:
ES <Enter>
( <Enter>
8 <Enter>
U <Enter>
ES <Enter>
( <Enter>
Notice that you must press <Enter> after each character or special code that is entered. Each code or character is immediately converted to hex and displays beneath your entry; “ES” is converted to 1B, “(“is converted to 28, “8” to 38, etc.
Press <Enter> to end entry of codes.
Options
Options available to you when entering hexidecimal codes are:
|
<Enter> |
When you have finished entering the complete control code, leave the current hex code blank and press <Enter>. If there are additional hex codes to the right of the cursor, they will be removed (the code will be truncated). |
|
<Up> |
Press the Up arrow key to highlight the previous hex code entry. |
|
<Down> |
Press the Down arrow key to highlight the next hex code entry. |
|
<F1> |
Insert a blank hex code at the cursor and shift the remaining hex codes to the right one position. |
|
<F2> |
Save the hex code you have entered. |
|
<F3> |
Delete the hex code at the current cursor position and shift the remaining hex codes to the left one position. |
This will print a list of the control codes that have been entered.
Select
labels from the CTL menu, then select Print control code listing from that menu.
You must next select a printer.
The Enter selection enables you to create or modify a label.
Select Create/Modify labels from the Labels menu of the CTL menu.
The following screen displays:
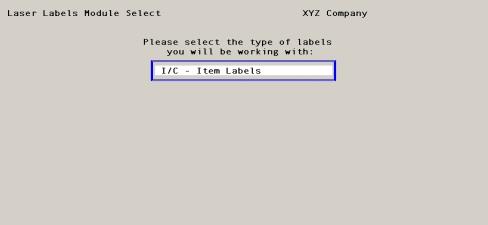
Only one PBS module is enabled. Select Enter on I/C - Item Labels. The following screen will display:

Enter the following fields:
1. Module / Label ID
The PBS module displays. Enter the name of the label.
|
Format |
10 characters |
|
Example |
ITEMLABEL |
2. Description
Enter a description for the label.
|
Format |
30 characters |
|
Example |
Item Label |
3. Label page control codes
Enter the label page control code.
Options
Enter a page control code, or use one of the options:
|
<F1> |
For the next printer code on file |
|
<Enter> |
For no code |
|
Format |
10 characters |
|
Example |
Select <Enter> |
4. Standard label font code
Enter the label font code.
Options
Enter a font code, or use one of the options:
|
<F1> |
For the next printer code on file |
|
<Enter> |
For no code |
|
Format |
10 characters |
|
Example |
Select <Enter> |
5. Printer reset code
Enter the printer reset code.
Options
Enter a reset code, or use one of the options:
|
<F1> |
For the next printer code on file |
|
<Enter |
For no code |
|
Format |
10 characters |
|
Example |
Select <Enter> |
Would you like to print a full-page location grid ?
Select Y to make print a location grid or enter N to continue entering the label information.
|
Format |
One character, Y or N, the default is Y |
|
Example |
Select <Enter> |
If you select Y, then you will see a screen like the following:
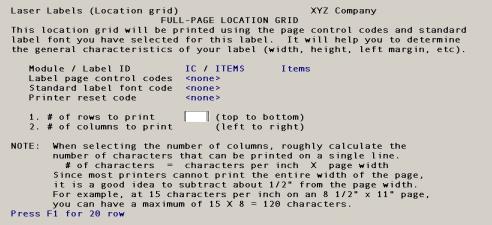
The printing of the grid provides a means of testing the position of the labels with your the label form and with your specific printer.
1. # of rows to print
Enter the number of rows that will print on your label or use the option:
|
<F1> |
For 20 rows |
2. # of columns to print
Enter the number of columns to print on your label or use the option:
|
<F1> |
For 80 columns |
Field number to change ?
Make any changes as necesary or select <Enter> to continue. On the next screen you will have to select a printer. It should be the same printer as the one in which you are printing your labels.
Please mount the labels on printer
Done
Type in DONE when you have mounted the labels on your printer.
Any change ?
Select N to accept the defaults or select Y to make changes to the form positioning fields. If you select Y, then enter the following fields:
Top margin ?
Enter the top margin before the first label prints from the top of the page.
Left margin ?
Enter the left margin.
Number of labels down the page
Enter the number of labels down the page.
When Any change ? is N and you select <Enter> then the printing will start.
Print the full-page location grid again ?
Select Y to print the grid again or select N to continue. When you select N then the Done screen will display.
Done
Type in DONE after have mounted the regular paper on your printer.
After the DONE screen you will return to the question Would you like to print a full-page location grid?. If you select N to that question, then a screen like the following will display:
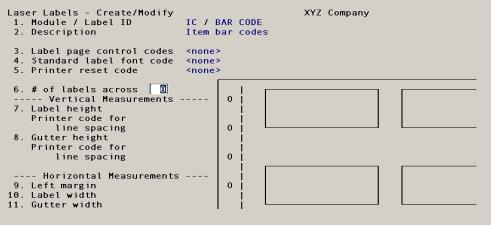
Enter the following fields:
6. # of labels across
Enter the number of labels across the page.
|
Format |
2 digits, not more than 20 |
|
Example |
2 |
This cannot be more than 20.
7. Label height
Enter a height for the label.
|
Format |
3 digits, not more than 198 |
|
Example |
12 |
The label height cannot be greater than 198.
Printer code for line spacing
Options
Enter a code for line spacing, or use the option:
|
<Enter> |
For no code |
|
Format |
10 characters |
|
Example |
<Enter> |
8.Gutter height
The gutter height is the distance between labels vertically. Enter a gutter height for the label.
|
Format |
2 digits |
|
Example |
1 |
Printer code for line spacing
Options
Enter a code, or use the option:
|
<Enter> |
For no code |
|
Format |
10 characters |
|
Example |
<Enter> |
9. Left margin
Enter a margin for the label.
|
Format |
2 digits |
|
Example |
1 |
The margin is the space between the label on the far left and the edge of the page.
10. Label width
Enter a width of the label.
|
Format |
3 digits |
|
Example |
35 |
The width is the number of columns wide the label is.
11. Gutter width
Enter a gutter width for the label.
|
Format |
2 digits |
|
Example |
1 |
The gutter width is the amount of columns between the labels. The number of labels across must be more than one in order to enter a gutter width.
Would you like to print a full-page location grid ?
Select Y to make print a location grid or enter N to continue.
|
Format |
One character, Y or N, the default is Y |
|
Example |
Select <Enter> |
If you select Y, then you will see a screen like the following:
Following the entry of the labels and margin fields, the printing of the grid provides a more precise test of the position of the labels with the label form and with your specific printer.
When you have finished that process you should select N to continue.
Field number to change ?
Options
Make any needed changes. If you are entering a new label then you will be on the screen where you select and format the fields.
Use one of the options if you are changing a label:
|
<F1> |
For next label format |
||||||||||||
|
<F2> |
To copy the label |
||||||||||||
|
<F3> |
To delete the label |
||||||||||||
|
<F7> |
Print menu - From the print menu you may select one of the following:
|
Upon pressing <Enter> the following question will display:
View/change label layout ?
Select Y to make view or change the label layout or enter N to complete the entry.
|
Format |
One character, Y or N, the default is Y |
|
Example |
Select <Enter> |
When you select Y to view the label layout, then a screen like the following will display:
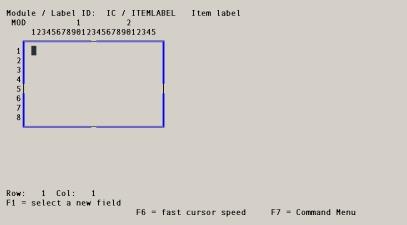
On this screen you determine which fields will be on the label and position the fields as needed.
Options
To enter the fields on the label use the following options:
|
<F1> |
To select a new field |
|
<F2> |
To pick up a label field (only available after at least one field has been entered) |
|
<F3> |
To remove a label field (only available after at least one field has been entered) |
|
<F5> |
To edit a label field (only available after at least one field has been entered) |
|
<F6> |
To use the fast cursor speed - when selected this will move the cursor to the right or left 5 spaces at a time |
|
<F7> |
Command menu |
Cursor is on: .........
If you have entered one or more fields and the cursor is on one of the fields, there will be an indication at the bottom of the screen to which field the cursor is on.
When you select <F1> to select a field you will see a screen similar to the following:
On this screen you have the following columns:
FIELD DESCRIPTION
This is a description of the field.
LENGTH CURRENT FORMAT
This is an example of the maximum length of the field.
USAGE
This indicates how many times the field was selected for the label.
Use the cursor to select a field.
You have several sets of field formatting options.
If you select a Text field then you will have the following fields to enter:
1. Text
Enter the text that will print on the label.
2. Suppress
If you select N, then you will move to the next field. If you select Y then you must choose a field to determine when the text will not print on the label.
3. Printer font code
Enter a printer font code for this field.
If you select a field from the field, then you have the following options:
1. Use an edit mask?
If you wish to mask the characters of the field with Xs, then select Y to this field. Select N if you want the full field to print.
2. Length to print
Enter a length of the field that you want to print. The maximum length is displayed to the right of the field.
3. Justify
The choices are left, right or print as is.
4. Printer font code
Enter a printer control font code for this field.
Numeric Field
These are the options for a numeric field.
1. Integer digits
If you wish to mask the characters of the field with Xs, then select Y to this field. Select N if you want the full field to print.
2. Decimal digits
Enter a length of the field that you want to print. The maximum length is displayed to the right of the field.
Round ?
Use this selection if you would like to round it to two decimal places.
3. Currency ?
The choices are left, right or print as is.
4. Use commas ?
Select Y if you wish to use commas on values greater than 999.
5. Negatives ?
If negatives are not allowed for the field, this will display as (Not applicable).
6. Print when zero ?
Select Y to print when the number is zero or N to not print when it is zero.
7. Printer font code
Enter a printer control font code for this field.
A date field has two choices:
1. Date format
There are 5 options for the date format:
|
MM/DD/YY |
This is the standard PBS date field format using a slash as a separator |
|
MM/DD |
Print only the month and day |
|
DD-MM-YY |
Print the day month and year with dashes as a separator |
|
DD-MMM |
Print the day with the month printer as text like the following: 01-JAN |
|
Month DD, YYYY |
The date will print like the following: January 01, 2010 |
2. Printer font code
Enter a printer control font code for this field.
The command menu has the following selections:
Insert blank row
Use this selection to insert a blank row where the cursor is positioned in your label.
Delete current row
This will delete the current row where the cursor is positioned.
Print menu
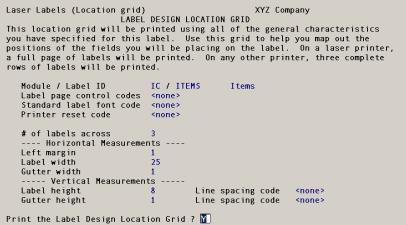
Several options are available on the print menu and they are the following:
|
Test this label layout |
Select this to print the test label |
|
Print labels |
To print the labels using the current label setup |
|
Full-page location grid |
To print a location grid |
|
Label design location grid |
To print a label design location grid |
Save changes
To save the changes made to the label.
Exit
Use this option to exit the menu creation program.
You may make changes as needed to existing labels.
When you have finished making changes and you selected the <Esc> key the following choices will display:
|
Save changes and exit |
To save the changes made and exit the program |
|
Exit without saving changes |
To exit the program without making any changes |
|
Return to edit |
To return to editing the label layout |
The print label specifications function enables you to print or display the label specifications fields.
Select
Labels from the CTL menu, then select Print label specifications from that menu.
The following screen will display:
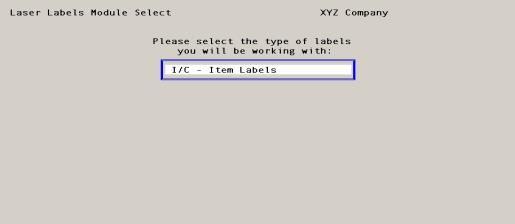
You only have one choice. Select the Enter key to accept I/C - Item Labels. You will then see the following screen:
You must enter the following fields:
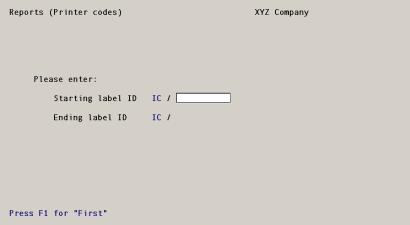
Starting label ID
Enter the starting label ID or use the option:
|
<F2> |
For the “First” label ID |
|
Format |
Up to 10 characters |
|
Example |
Select <F2> for the first label. |
Ending label ID
Enter the starting label ID or use the option:
|
<F2> |
For the next label format ID |
|
Format |
Up to 10 characters |
|
Example |
Select <F2> for the next label |
Any change ?
Enter Y to make changes or accept the default.
|
Format |
One character, Y or N, the default is N |
|
Example |
Select <Enter> |
You will be asked to select a printer.
Use this selection to print your labels.
Select
Labels from the CTL menu, then select Print labels from that menu.
The following screen will display:
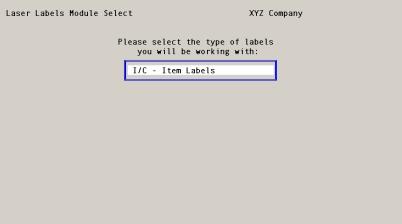
You only have one choice. Select the Enter key to accept I/C - Item Labels. You will then see the following screen:
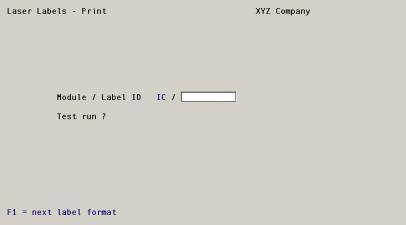
You must enter the following fields:
Module / Label ID
Enter the starting label ID or use the option:
|
<F2> |
For the next label format |
|
Format |
Up to 10 characters |
|
Example |
Select <F2> for the first label. |
Test run ?
Enter Y if this is a test run or select <Enter> if you are going to print the labels.
|
Format |
One character, Y or N, the default is N |
|
Example |
Select <Enter> |
When you print a test run, then one label will print with x’s for alphnumeric fields and 9’s for numeric fields.
You will be asked to select a printer. Following the selection of a printer the following prompts will display:
Please mount the labels on printer
Type “DONE” when ready
Type in DONE when you have mounted the labels on your printer.
Print another test ?
Select Y to print another test or select N to complete the test. If you select N then the following prompts will display:
Please mount regular paper on printer
Type “DONE” when ready
Type in DONE after you have mounted the regular paper on your printer. You will be return to the menu.
When you select N to print a test run then you will be prompted for:
Any change ?
Select Y to make changes or select <Enter> to accept the default and the following screen will display:

Labels down the page
Enter the number of labels down the page. Do not count the labels across the page, only the row of labels down the page. Only count the entire group of fields in a label as 1.
When printing to a laser printer, this number determines the point where the program ejects the paper.
|
Format |
One character, Y or N, the default is N |
|
Example |
Select <Enter> |
Label print order
There are 4 sort options:
|
I |
Print in item number order |
|
D |
Print in item description order |
|
L |
Print by location order |
|
R |
Print by quantity received order |
If you selected to print in item order a screen similar to the following will display:
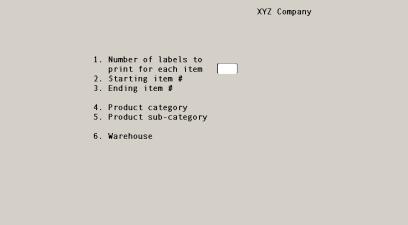
Enter the following fields if on the previous field you selected either item number, item description or quantity received:
1. Number of labels to print for each item ?
Enter the number of labels to print for each item selected.
|
Format |
3 digits |
|
Example |
1 |
2. Starting item # or
2. Starting description or
2. Starting location
Enter the starting item number, description or location or use the option:
|
<F2> |
For the “First” item number, description or location |
|
Format |
12 characters for item number 25 characters for item description 4 characters for location |
|
Example |
<F2> |
3. Ending item # or
3. Ending description or
3. Ending location
Enter the ending item number, description or location or use the option:
|
<F2> |
For the “Last” item number description or location |
|
Format |
12 characters for item number 25 characters for item description 4 characters for location |
|
Example |
<F2> |
4. Product category
Enter the product category or use the option:
|
<F5> |
For the “All” categories |
|
Format |
5 characters |
|
Example |
<F5> |
5. Product sub-catagory
Enter the product sub-category or use the option:
|
<F5> |
For the “All” sub-categories |
|
Format |
5 characters |
|
Example |
Not available because of entry in field 4 |
6. Warehouse
Enter the warehouse number or use the option:
|
<Enter> |
For the central warehouse |
|
Format |
2 characters |
|
Example |
Select <Enter> |
Any change ?
Select Y to make changes or select N for the printer selection screen to display.
Following the selection of a printer you have the following prompt:
Please mount the labels on printer
Type “DONE” when ready
Type in DONE when you have mounted the labels on your printer.
Print alignment ?
Select Y to print an alignment or select N to print the labels. If you select Y to print an alignment then the following prompts will display:
Top margin ?
Enter the top margin before the first label prints from the top of the page.
Left margin ?
Enter the left margin.
Number of labels down the page
Enter the number of labels down the page.
When Any change ? is N and you select <Enter> then the printing will start.
If you select N then the following prompts will display:
Total number of labels printed: 999
Please mount regular paper on printer
Type “DONE” when ready
Type in DONE after you have mounted the regular paper on your printer. You will be return to the menu.
This is intended to test your printer to determine if it will print labels using the PBS labels technology.
Select
From the CTL menu select Test printer capabilities from the Labels main menu. You will see a screen like the following:
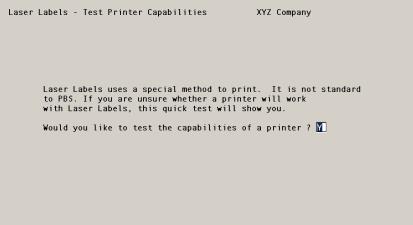
Would you like to test the capabilities of a printer ?
Enter Y to test a printer or N to return to the menu.
|
Format |
One character, Y or N, the default is Y |
|
Example |
Select <Enter> |
You will be asked to select a printer. After selecting a printer then a screen similar to the following will display:
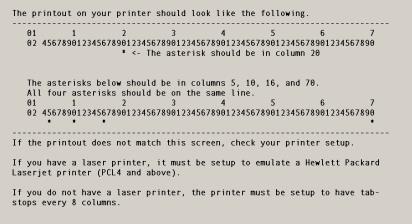
A “Test complete” window will also display. Select the <Enter> key to close the window and the test printer screen. Review the report to determine the capabilities of your printer.